Total Pageviews

Wednesday, 26 April 2017

RHEL-7 - Setup Local YUM repository

Setup Local Yum Repo
====================
1. Transfer/download ISO on local server on desired path (in my case /root)

2. mount ISO to /mnt, as mentioned below
[root@dcamvirldcT001 yum.repos.d]# mount -o loop /root/rhel-server-7.2-x86_64-dvd.iso /mnt/

3. Locate .repo file on /etc/yum.repo.d  and take copy of orignal .repo file
[root@ominvirldcT001 yum.repos.d]# ll
total 4
-rw-r--r-- 1 root root 359 Apr 26 19:30 redhat.repo
[root@ominvirldcT001 yum.repos.d]# cp -p redhat.repo redhat.repo.orig
[root@ominvirldcT001 yum.repos.d]# ll
total 8
-rw-r--r-- 1 root root 359 Apr 26 19:30 redhat.repo
-rw-r--r-- 1 root root 359 Apr 26 19:30 redhat.repo.orig
[root@ominvirldcT001 yum.repos.d]#

4. Edit redhat.repo as per you ISO path as mentioned below.
[root@ominvirldcT001 yum.repos.d]# cat redhat.repo
#
# Certificate-Based Repositories
# Managed by (rhsm) subscription-manager
#
# *** This file is auto-generated.  Changes made here will be over-written. ***
# *** Use "subscription-manager repo-override --help" if you wish to make changes. ***
#
# If this file is empty and this system is subscribed consider
# a "yum repolist" to refresh available repos
#
[LocalRepo]
name=Local Repository
baseurl=file:///mnt
enabled=1
gpgcheck=1
gpgkey=file:///etc/pki/rpm-gpg/RPM-GPG-KEY-redhat-release
[root@ominvirldcT001 yum.repos.d]#

5. .repo file permision should be 644, else change chmod 644 redhat.repo
[root@ominvirldcT001 yum.repos.d]# chmod 644 redhat.repo

6. clear the related caches by yum clean all and subscription-manager clean once
# yum clean all
# subscription-manager clean
#yum update all

[root@dcamvirldcT001 ~]# yum update all
Loaded plugins: langpacks, product-id, search-disabled-repos, subscription-manager
This system is not registered to Red Hat Subscription Management. You can use subscription-manager to register.
LocalRepo                                                                                                                                        | 4.1 kB  00:00:00
(1/2): LocalRepo/group_gz                                                                                                                        | 136 kB  00:00:00
(2/2): LocalRepo/primary_db                                                                                                                      | 3.6 MB  00:00:00
No Match for argument: all
No package all available.
No packages marked for update
[root@ominvirldcT001 ~]#

7. check whether you can get the packages list from the DVD repo
# yum  --noplugins list

8. if no problem , you wil update
# yum  --noplugins update
Chef Workstation, Server and Node -Installtion and Configuration


ominvirldcT001 - Server

ominvirldctest002 - Node

ominvirldctest003-  Workstation


Chef Woerkstation Installation

==============================

[root@ominvirldctest003 var]# rpm -ivh chefdk-1.3.43-1.el7.x86_64.rpm

warning: chefdk-1.3.43-1.el7.x86_64.rpm: Header V4 DSA/SHA1 Signature, key ID 83ef826a: NOKEY

Preparing...                          ################################# [100%]

Updating / installing...

   1:chefdk-1.3.43-1.el7              ################################# [100%]

Thank you for installing Chef Development Kit!

[root@ominvirldctest003 var]#


1.Follow the steps in the installer and install the Chef development kit to your machine. The Chef development kit is installed to /opt/chefdk/ on UNIX and Linux systems.


2.When finished, open a command window and enter the following:

$ chef verify


3. Create a .chef directory to store admin.pem and validator.pem key.

[root@ominvirldctest003 bin]# mkdir -p /root/chef-repo/.chef

===================================================================

===================================================================

===================================================================

Chef Server Installation

==========================


[root@ip-10-38-18-11 ec2-user]# wget https://packages.chef.io/files/stable/chef-server/12.14.0/el/7/chef-server-core-12.14.0-1.el7.x86_64.rpm

--2017-04-23 19:46:40--  https://packages.chef.io/files/stable/chef-server/11.1.6/el/6/chef-server-core-12.14.0-1.el7.x86_64.rpm

Resolving packages.chef.io (packages.chef.io)... 151.101.60.65

Connecting to packages.chef.io (packages.chef.io)|151.101.60.65|:443... connected.

HTTP request sent, awaiting response... 200 OK

Length: 277963090 (265M) [application/x-rpm]

Saving to: ‘chef-server-core-12.14.0-1.el7.x86_64.rpm’


100%[=========================================================================================================>] 277,963,090 27.4MB/s   in 8.6s


2017-04-23 19:47:03 (30.8 MB/s) - ‘chef-server-core-12.14.0-1.el7.x86_64.rpm’ saved [277963090/277963090]


[root@ip-10-38-18-11 ec2-user]#


[root@ip-10-38-18-11 ec2-user]# rpm -ivh chef-server-core-12.14.0-1.el7.x86_64.rpm

warning: chef-server-core-12.14.0-1.el7.x86_64.rpm: Header V4 DSA/SHA1 Signature, key ID 83ef826a: NOKEY

Preparing...                          ################################# [100%]

Updating / installing...

   1:chef-server-11.1.6-1.el6         ################################# [100%]

Thank you for installing Chef Server!


The next step in the install process is to run:


sudo chef-server-ctl reconfigure


==========================

Run the following to start all of the services:

[root@ip-10-38-18-10 ~]# chef-server-ctl reconfigure


============================

[root@ip-10-38-18-10 ~]# chef-server-ctl status

run: bookshelf: (pid 15186) 1998s; run: log: (pid 15147) 2000s

run: oc_bifrost: (pid 14307) 2025s; run: log: (pid 14309) 2025s

run: oc_id: (pid 14423) 2014s; run: log: (pid 14425) 2014s

run: opscode-erchef: (pid 15400) 1989s; run: log: (pid 15399) 1989s

run: opscode-expander: (pid 14912) 2006s; run: log: (pid 15051) 2004s

run: opscode-solr4: (pid 9036) 45s; run: log: (pid 14680) 2008s

run: postgresql: (pid 13796) 2040s; run: log: (pid 13818) 2039s

run: rabbitmq: (pid 9184) 1s; run: log: (pid 10329) 2082s


===========================

Run the following command to create an administrator:

#chef-server-ctl user-create USER_NAME FIRST_NAME LAST_NAME EMAIL 'PASSWORD' --filename FILE_NAME

[root@ip-10-38-18-10 ~]# chef-server-ctl user-create barunkumar9 barun kumar9 barun.kumar9@rb.com 'qwerty' --filename /etc/chef/admin.pem

============================

Run the following command to create an organization:

$ chef-server-ctl org-create short_name 'full_organization_name' --association_user user_name --filename ORGANIZATION-validator.pem


--------------------------------------------

The name must begin with a lower-case letter or digit, may only contain lower-case letters, digits, hyphens, and underscores, and must be between 1 and 255 characters. For example: 4thcoffee.


The full name must begin with a non-white space character and must be between 1 and 1023 characters. For example: 'Fourth Coffee, Inc.'.


The --association_user option will associate the user_name with the admins security group on the Chef server.


An RSA private key is generated automatically. This is the chef-validator key and should be saved to a safe location. The --filename option will save the RSA private key to the specified absolute path.


[root@ip-10-38-18-214 chef]# chef-server-ctl org-create cloudit4tech 'CloudITTechnology.' --association_user barunkumar9 --filename /etc/chef/cloudITtech-validator.pem


=====================

Use Chef management console to manage data bags, attributes, run-lists, roles, environments, and cookbooks from a web user interface.

On the Chef server, run:

4   chef-server-ctl install chef-manage

5  chef-server-ctl reconfigure

6.[root@ominvirldcT001 ~]# chef-manage-ctl reconfigure

    To use this software, you must agree to the terms of the software license agreement.

Press any key to continue.

Type 'yes' to accept the software license agreement, or anything else to cancel.

yes

=============================

Use Chef push jobs to run jobs—an action or a command to be executed—against nodes independently of a chef-client run.

On the Chef server, run:

[root@ominvirldcT001 ~]# chef-server-ctl install opscode-push-jobs-server

then:

[root@ominvirldcT001 ~]# chef-server-ctl reconfigure

and then:

[root@ominvirldcT001 ~]# opscode-push-jobs-server-ctl reconfigure


=============================


Use Reporting to keep track of what happens during every chef-client runs across all of the infrastructure being managed by Chef. Run Reporting with Chef management console to view reports from a web user interface.

On the Chef server, run:


[root@ominvirldcT001 ~]# chef-server-ctl install opscode-reporting

then:

[root@ominvirldcT001 ~]# chef-server-ctl reconfigure

and then:

[root@ominvirldcT001 ~]# opscode-reporting-ctl reconfigure


=============================

Update config for purchased nodes


When using more than 25 nodes, a configuration change to your Chef server needs to be made in order for your Chef server to be properly configured and recognize your purchased licenses. You will need to edit to your chef-server.rb file by following the process below:


1.On your Chef server, if the chef-server.rb file does not exist, create it.

sudo mkdir /etc/opscode && sudo touch /etc/opscode/chef-server.rb

2.Open up the newly created chef-server.rb file in your favorite text editor.

sudo vi /etc/opscode/chef-server.rb

3.Paste or add the following text. Please note the placement of the single quotation (‘) marks.

license['nodes'] = N where N is the number of licensed nodes you have purchased

4.Save the file. Because we are using the vi editor, you can save your changes in vi with the following command:

:wq

1.Run chef-server-ctl reconfigure for the changes to be picked up by your Chef server.

sudo chef-server-ctl reconfigure


Connection to ominvirldctest003 closed.

[root@ominvirldcT001 ~]# cd /etc/ch

chef/        chef-manage/ chkconfig.d/

[root@ominvirldcT001 ~]# cd /etc/chef

[root@ominvirldcT001 chef]# ll

total 8

-rw-r--r-- 1 root root 1678 Apr 26 16:57 admin.pem

-rw-r--r-- 1 root root 1678 Apr 26 16:57 cloudITtech-validator.pem

[root@ominvirldcT001 chef]# scp -r * ominvirldctest003:/root/chef-repo/.chef

root@ominvirldctest003's password:

admin.pem                                                                                                                             100% 1678     1.6KB/s   00:00

cloudITtech-validator.pem                                                                                                             100% 1678     1.6KB/s   00:00

[root@ominvirldcT001 chef]#


=========

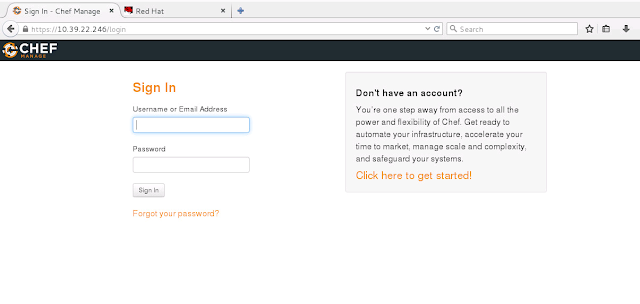
Login to Chef Server GUI https://10.39.22.246/login


========================
=================================
=================================


If you want to dig more please refer this link. https://docs.chef.io/install_dk.html


Saturday, 22 April 2017

SNMP Setup on SUSE 11 SPX 64bit


1  Install net-snmp package on Server  

# zypper in net-snmp*

2. 
2.       Configure SNMP : ◦ # snmpconf -i
◦ Input 'all' (Read in and merge the SNMP configuration files)
◦ Select option #1 (Create snmpd.conf)
◦ Select option #1 (Access Control Setup)
◦ Select option #3 (Setup a read-only access community) cloudIT12$inf (Input community name)
Press 'Enter' (Allow all hosts and network addresses to access the community)
Press 'Enter' (Not restrict the community to any specific OID)

◦ Input 'finished'
◦ Input 'finished'
◦ Input 'quit'

3.       Add server address and port to /etc/snmp/snmpd.conf
gb02qap595rbb2m:~ # cat /etc/snmp/snmpd.conf
# Please see /usr/share/doc/packages/net-snmp/EXAMPLE.conf for a
# more complete example and snmpd.conf(5).
#
# Writing is disabled by default for security reasons.  If you'd like
# to enable it uncomment the rwcommunity line and change the community
# name to something nominally secure (keeping in mind that this is
# transmitted in clear text).

# don't use ' < > in strings for syslocation or syscontact
# Note that if you define the following here you won't be able to change
# them with snmpset
syslocation Server Room
syscontact Sysadmin (root@localhost)

# These really aren't meant for production use.  They include all MIBS
# and can use considerable resources.  See snmpd.conf(5) for information
# on setting up groups and limiting MIBS.
rocommunity public 127.0.0.1
# rwcommunity mysecret 127.0.0.1
agentaddress 10.30.19.70:161
4.       Start SNMP agent and verify listening port
#rcsnmpd start

dcindev201cloit:~ #

dcindev201cloit:~ # netstat -aunt | grep -i 161
udp        0      0 10.30.19.70:161        0.0.0.0:*
dcindev201cloit:~ #
5.       snmpwalk -v 1 -c cloudIT12$inf <IP of current server>
Once this command will get executed. You will get long output message and finish. That means SNMP agent got configured and working fine