Total Pageviews

Wednesday, 30 April 2014

2002 (HY000): Can't connect to local MySQL server through socket '/tmp/mysql.sock (2)

ERROR 2002 (HY000): Can't connect to local MySQL server through socket '/tmp/mysql.sock' (2)
it is not the error bcoz when mysql deamon starts it 1st checks the /tmp/mysql.sock
if /tmp permission changes to other than 777 then the above error comes
i've faced the same error 
when i checked /var/lib/mysql/ for mysql.sock it didn't found there it never happens when it is not found but if not found then try to create uor self command is

cd /var/lib/mysql 
touch mysql.sock
chown mysql:mysql mysql.sock
chmod 1777 mysql.sock

now make a sym link into /tmp 

ln -s /var/lib/mysql/mysql.sock /tmp
then
chmod 1777 /tmp

now 
/scripts/mysqlup --force


now just restart mysql
/etc/rc.d/init.d/mysql restart

Wednesday, 9 April 2014

Oracle Solaris 11 Installation Steps..

Step-by-Step Installation of Oracle Solaris 11 SPARC

Ensure that your hardware supports Oracle Solaris 11 Operating System. If you are unsure, please visit the below URL and check the compatibility list:

http://www.oracle.com/webfolder/technetwork/hcl/data/s11ga/index.html

You can download Solaris 11 operating system iso image here:
http://www.oracle.com/technetwork/server-storage/solaris11/downloads/index.html

Select ‘Download for SPARC – Text Install’. Please check MD5 checksun to ensure the downloaded file is not corrupt. After having downloaded this image, please write it to DVD using any ISO burner (such as Free ISO Burner).

Connect to the system console either via ILOM, ALOM, XSCF etc through serial cable or SSH over the network in case of remote management configured. Login to the console, in my example a T2000 machine has been used.

On SC prompt type console –f and console respectively and hit enter. You will now get OK prompt, if you powered on the server. Please note, you cannot do a version upgrade from Solaris 10 to Solaris 11. There are several differences in these two versions, many features are now obsolete. Solaris 11 has to be a fresh install.

Make sure Solaris 11 DVD is inserted in the DVD drive. Now type boot cdrom on OK prompt to begin installation as shown in the below screenshot:


The pre-installation phase or requirements gathering phase will being. Oracle Solaris 11 will ask several questions with options to you. The first step is to select the keyboard layout of your choice. Defaut keyboard layout for Oracle Solaris 11 installation via DVD is US-English.


Next, select the language of your choice, default installation language for Oracle Solaris 11 is English.

Next step will give you an option to Install Oracle Solaris. If you are using a remote ssh session on shell, I would rather select 4 Terminal type and specify the correct terminal type I am using, in order for me to have a aligned display of the installation screens. The next page will give you further details about this.


Select option 4 and select the correct terminal type. vt100 is your best if you are unsure about what terminal type are you using. While installing Oracle Solaris 11, the screen type chosen here will help you a lot.


Select 1 to install Oracle Solaris 11. As you can see 1 is the default value, hence you can just press enter/return key here.


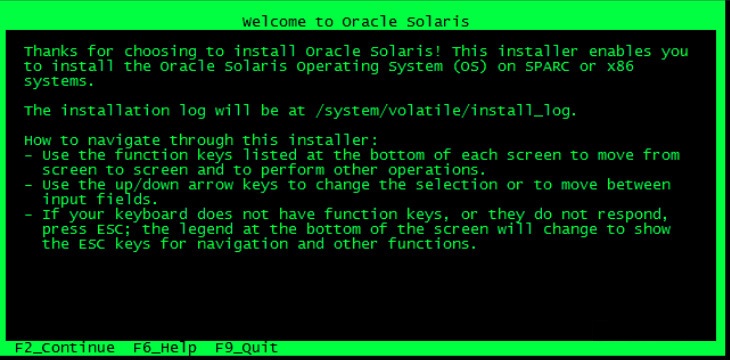
Next screen will show you the location of installation log, which is /system/volatile/install_log.
Remember, from here until completion of install Oracle Solaris 11, you can move to forward screen by pressing F2 or to quit you can press F9.


After you are on next screen of Solaris 11 installation, you will have the disk option, disk where Oracle Solaris 11 will be installed. Very important point to note and also, a considerable difference from Solaris 10 to Solaris 11 is noticed in this step. Solaris 11 is installed on rpool. Yes, zfs is the default file system of Oracle Solaris 11. To remind you, Solaris 10 has UFS as default file system.


Select the desired disk, I would recommend a whole disk for the installation, however, you have the option to install it on a single slice.

Now, Oracle Solaris 11 installer will give you option to choose a hostname. Type any name that you want. If you want to change it later, you can change hostname from Solaris 11 operating system once the system is fully installed. The default name is solaris.


You will also get options to choose from regarding how would you like to setup networking on the machine. If you are using DHCP you can select ‘Automatically’ or if you know the IP address, netmask value and gateway address, you can select Manually and provide these details for an interface to be plumbed and IP configured. Alternatively, if you are experienced with Oracle Solaris 10, you can choose ‘None’ to manually plumb and configure network interface later, after the Operating System is installed.

Next screen is to select time zone:

Now select location that contains your time zone, press F2 to continue:

Select Time Zone based on your location or preference:

Next screen to set password for root and user account for yourself. 


Next screen is Installation summery, verify and press F2 if everything correct.


Installation will take around 15 to 20 minutes to complete. Here you can see installation progress.

Installation completed, press F8 to reboot.


Tuesday, 8 April 2014

Create Custom YUM Repository


Custom YUM Repository

Sometimes we need to create a Custom YUM Repository (handy when the VPS has no internet connection). We can create a Custom YUM Repository from a desired number of selected RPM package files. Custom YUM Repository only holds the RPM package files we want to include in. 
Step 1: Install "createrepo"
To create Custom YUM Repository we need to install additional software called "createrepo" on our cloud server. We can install "createrepo" by running the following command from console:

yum install createrepo

Step 2: Create Repository directory
We need to create a new directory that will be the location of our Custom YUM Repository and will hold the desired RPM package files. We can do this with the following command from console (choose a different /repository1 directory name if you like):

mkdir /repository1
Step 3: Put RPM files to Repository directory
If RPM package files are not yet present on our VPS we need to transfer them to our cloud server via FTP or SSH - use software like WinSCP (free SFTP client and FTP) or similar. We can also download RPM package files directly to our VPS (internet connection needed) with "wget" command from console (please change HTTP link accordingly):

wget ftp://my.barun.com/CentOS/6/os/i386/Packages/NetworkManager-0.8.1-43.el6.i686.rpm

If RPM files are already present on our VPS, we need to Copy or Move these files to the newly created directory from "Step 2". We can move RPM files with the following command from console (please change /path/to/rpm and /repository1 accordingly):

mv /path/to/rpm /repository1

We can copy RPM files with the following command from console (please change /path/to/rpm and /repository1 accordingly):
cp /path/to/rpm /repository1
Step 4: Run "createrepo"
Createrepo command reads through Custom YUM Repository directory from "Step 2" and creates a new directory called "repodata" in it. Repodata directory holds the metadata information for the newly created repository. Every time we add additional RPM package files to our Custom YUM Repository, we need to re-create Repository metadata with "createrepo" command. We can create new repository metadata by running the following command from console (please change /repository1 accordingly):
createrepo /repository1
Step 5: Create YUM Repository Configuration file
To start using the newly created Custom YUM Repository, we must create the corresponding YUM Repository Configuration file with .repo extension, which must be placed to /etc/yum.repos.d/ directory. Instructions to create YUM Repository Configuration file are covered in the first topic of this article called "YUM Repository Configuration File". 
Example Custom YUM Repository Configuration file:
/etc/yum.repos.d/custom.repo
[customrepo]
name=Custom Repository
baseurl=file:///repository1/
enabled=1
gpgcheck=0

YUM Repository Configuration File

We can install new software on Red Hat/CentOS Linux with "yum install packagename" command from console. Running this command first checks for existing YUM Repository configuration files in /etc/yum.repos.d/ directory. It reads each YUM Repository configuration file to get the information required to download and install new software, resolves software dependencies and installs the required RPM package files.

YUM Repository configuration files must:


be located in /etc/yum.repos.d/ directory


have .repo extension, to be recognized by YUM

Available YUM Repository configuration file options are:


Repository ID - One word unique repository ID (example: [examplerepo])


Name - Human readable name of the repository (example: name=Example Repository)


Baseurl - URL to the repodata directory. You can use file://path if repository is located locally or ftp://link, http://link, https://link if repository is located remotely - HTTP Authentication availablehttp://user:password@www.repo1.com/repo1 (example: baseurl=http://mirror.cisp.com/CentOS/6/os/i386/)


Enabled - Enable repository when performing updates and installs (example: enabled=1)


Gpgcheck - Enable/disable GPG signature checking (example: gpgcheck=1)


Gpgkey - URL to the GPG key (example: gpgkey=http://mirror.cisp.com/CentOS/6/os/i386/RPM-GPG-KEY-CentOS-6)


Exclude - List of the packages to exclude (example: exclude=httpd,mod_ssl)


Includepkgs - List of the packages to include (example: include=kernel)

Required YUM Repository configuration file options are:


Repository ID


Name


Baseurl


Enabled


Linux User Based Troubleshooting..!!

Scene 1: /etc/passwd is deleted
This is an important file in Linux as it contains information about user accounts and passwords. If it’s missing in your system and you try to log in to a user account, you get an error message stating Log-in incorrect and after restarting the system.
Now that you have seen the problem and its consequences, it’s time to solve it. Boot into single user mode. At the start of booting, press any key to enter into the GRUB menu. Here you will see a list of the operating systems installed. Just select the one you are working with and press.
It’s time to have some fun with kernel parameters. So highlight the kernel and again press e to edit its parameters.
Next, instruct the kernel to boot into single user mode, which is also known as maintenance mode. Just type 1 after a space and press the Enter key. Now press b to continue the booting process.
Now that you have booted into single user mode, you are probably asking yourself, What is next?. The tricky portion of this exercise is now over and it takes just one command to have your passwd file in its place. Actually, there is a file /etc/passwd-, which is nothing but the backup file for /etc/passwd. So all you need to do is to issue the following command:
cp /etc/passwd- /etc/passwd
…and you are done. Now you can issue the init 5 command to switch to the graphical mode. Everything is fine now. You can also find the backup of /etc/shadow and /etc/gshadow as /etc/shadow- and /etc/gshadow- respectively.
Scene 2: /etc/pam.d/login is deleted
If your /etc/pam.d/login file is deleted and you try to log in, it won’t ask you to enter your password after entering your username. Instead, it will continuously show the localhost login prompt. Here again, there is a single command that will solve the problem for you:
cp /etc/pam.d/system-auth /etc/pam.d/login
Just boot into the single user mode as done earlier, type this command and you’ll be able to log in normally. There is also a second solution to this problem, which we’ll look at after a while.
Scene 3: /etc/inittab is deleted
We know that in Linux, init is the first process to be started and it starts all the other processes. The /etc/inittab file contains instructions for the init process and if it’s missing, then no further process can be launched. On starting a system with no inittab file, it will show the following message:
INIT:No inittab file found …and will ask you to enter a runlevel. When you do that, it again shows the message that no more processes are left in this runlevel.
Fixing this problem is not easy because being in the single user mode doesn’t help in this case. Here, you need the Linux rescue environment to fix this problem. So set your first boot device to CD and boot with the RHEL5 CD. At the boot prompt, type ‘Linux rescue’ to enter the rescue environment.
Once you have entered into the rescue environment, your system will be mounted under /mnt/sysimage. Here, reinstall the package that provides the /etc/inittab file. The overall process is given below:
chroot /mnt/sysimage 
rpm -q --whatprovides /etc/inittab 
mkdir /a 
mount /dev/hdc /a 
 
Here /dev/hdc is the path of the CD. It may vary on your system, though. 
 
rpm –Uvh --force /a/Server/initscripts-8.45.25-1.el5.i386.rpm
You can also hit the Tab key after init to auto complete the name.
Now you’ll get your /etc/inittab file back. The same procedure can be applied to recover the /etc/pam.d/login file. In this case, you’ll have to install the util-linux package. Once you are done with it, type Exit to leave the rescue environment, set your first boot device to hard disk and boot normally.
Scene 4: /boot/grub/grub.conf is deleted
This file is the configuration file of the GRUB boot loader. If it is deleted and you start your machine, you will see a GRUB prompt that indicates that grub.conf is missing and there is no further instruction for GRUB to carry on its operation.
But don’t worry, as we’ll solve this problem, too, in the next few minutes. You don’t even need to enter single user mode or the Linux rescue environment for this. At the GRUB prompt, you can enter some command that can make your system boot. So here we go: Type root (and hit Tab to find out the hard disks attached to the system. In my case, I got hd0 and fd0—the hard disk and floppy disk, respectively). Now we know that GRUB is stored in the first sector of a hard disk, which is hd0,0. So the complete command would be root (hd0,0). Enter this command and press the Enter key to carry on.
You now need to find out the kernel image file. So enter kernel /v and hit Tab to auto complete it. In my system, it’s vmlinuz-2.6.18-128.el5. Please note it down as we’ll require this information further, and then press Enter.
Next, let’s figure out the initrd image file. So enter initrd /i and press Tab to auto complete it. For me, it’s initrd-2.6.18-128.el5.img. Again note it down and press Enter.
Type boot and press Enter, and the system will boot normally.
Now it’s time to create a grub.conf file manually. So create the /boot/grub/grub.conf file and enter the following data in it:
 
splashimage=(hd0,0)/grub/splash.xpm.gz 
default=0 
timeout=5 
title Red Hat 
root (hd0,0) 
kernel /vmlinuz-2.6.18-128.el5 
initrd /initrd-26.18-128.el5.img
Save the file and quit it. You have created a grub.conf file manually to resolve the problem. Don’t forget that the kernel and the initrd image file name may vary on your system. That’s why I asked you to note them down earlier. You can also find them in the /boot folder once you are logged in it’s not a big issue.

Wednesday, 26 February 2014

Linux Network Bonding..!!

Linux Network bonding
Linux network Bonding is creation of a single bonded interface by combining 2 or more Ethernet interfaces. This helps in high availability of your network interface and offers performance improvement. Bonding is same as port trunking or teaming.
Bonding allows you to aggregate multiple ports into a single group, effectively combining the bandwidth into a single connection. Bonding also allows you to create multi-gigabit pipes to transport traffic through the highest traffic areas of your network. For example, you can aggregate three megabits ports into a three-megabits trunk port. That is equivalent with having one interface with three megabytes speed
Steps for bonding in Oracle Enterprise Linux and Redhat Enterprise Linux are as follows..
Step 1.
Create the file ifcfg-bond0 with the IP address, netmask and gateway. Shown below is my test bonding config file.
$ cat /etc/sysconfig/network-scripts/ifcfg-bond0
DEVICE=bond0
IPADDR=192.168.1.12
NETMASK=255.255.255.0
GATEWAY=192.168.1.1
USERCTL=no
BOOTPROTO=none
ONBOOT=yes
Step 2.

Modify eth0, eth1 and eth2 configuration as shown below. Comment out, or remove the ip address, netmask, gateway and hardware address from each one of these files, since settings should only come from the ifcfg-bond0 file above. Make sure you add the MASTER and SLAVE configuration in these files.
$ cat /etc/sysconfig/network-scripts/ifcfg-eth0
DEVICE=eth0
BOOTPROTO=none
ONBOOT=yes
# Settings for Bond
MASTER=bond0
SLAVE=yes
$ cat /etc/sysconfig/network-scripts/ifcfg-eth1
DEVICE=eth1
BOOTPROTO=none
ONBOOT=yes
USERCTL=no
# Settings for bonding
MASTER=bond0
SLAVE=yes
$ cat /etc/sysconfig/network-scripts/ifcfg-eth2
DEVICE=eth2
BOOTPROTO=none
ONBOOT=yes
MASTER=bond0
SLAVE=yes
Step 3.

Set the parameters for bond0 bonding kernel module. Select the network bonding mode based on you need, The modes are
  • mode=0 (Balance Round Robin)
  • mode=1 (Active backup)
  • mode=2 (Balance XOR)
  • mode=3 (Broadcast)
  • mode=4 (802.3ad)
  • mode=5 (Balance TLB)
  • mode=6 (Balance ALB)
Add the following lines to /etc/modprobe.conf
# bonding commands
alias bond0 bonding
options bond0 mode=1 miimon=100
Step 4.
Load the bond driver module from the command prompt.
$ modprobe bonding
Step 5.
Restart the network, or restart the computer.
$ service network restart # Or restart computer
When the machine boots up check the proc settings.
$ cat /proc/net/bonding/bond0
Ethernet Channel Bonding Driver: v3.0.2 (March 23, 2006)
Bonding Mode: adaptive load balancing
Primary Slave: None
Currently Active Slave: eth2
MII Status: up
MII Polling Interval (ms): 100
Up Delay (ms): 0
Down Delay (ms): 0
Slave Interface: eth2
MII Status: up
Link Failure Count: 0
Permanent HW addr: 00:13:72:80: 62:f0
Look at ifconfig -a and check that your bond0 interface is active. You are done!. For more details on the different modes of bonding,.
To verify whether the failover bonding works..
  • Do an ifdown eth0 and check /proc/net/bonding/bond0 and check the “Current Active slave”.
  • Do a continuous ping to the bond0 ipaddress from a different machine and do a ifdown the active interface. The ping should not break.
  RHEL bonding supports 7 possible “modes” for bonded interfaces. These modes determine the way in which traffic sent out of the bonded interface is actually dispersed over the real interfaces. Modes 0, 1, and 2 are by far the most commonly used among them.
  • Mode 0 (balance-rr)
    This mode transmits packets in a sequential order from the first available slave through the last. If two real interfaces are slaves in the bond and two packets arrive destined out of the bonded interface the first will be transmitted on the first slave and the second frame will be transmitted on the second slave. The third packet will be sent on the first and so on. This provides load balancing and fault tolerance.
  • Mode 1 (active-backup)
    This mode places one of the interfaces into a backup state and will only make it active if the link is lost by the active interface. Only one slave in the bond is active at an instance of time. A different slave becomes active only when the active slave fails. This mode provides fault tolerance.
  • Mode 2 (balance-xor)
    Transmits based on XOR formula. (Source MAC address is XOR’d with destination MAC address) modula slave count. This selects the same slave for each destination MAC address and provides load balancing and fault tolerance.
  • Mode 3 (broadcast)
    This mode transmits everything on all slave interfaces. This mode is least used (only for specific purpose) and provides only fault tolerance.
  • Mode 4 (802.3ad)
    This mode is known as Dynamic Link Aggregation mode. It creates aggregation groups that share the same speed and duplex settings. This mode requires a switch that supports IEEE 802.3ad Dynamic link.
  • Mode 5 (balance-tlb)
    This is called as Adaptive transmit load balancing. The outgoing traffic is distributed according to the current load and queue on each slave interface. Incoming traffic is received by the current slave.
  • Mode 6 (balance-alb)
    This is Adaptive load balancing mode. This includes balance-tlb + receive load balancing (rlb) for IPV4 traffic. The receive load balancing is achieved by ARP negotiation. The bonding driver intercepts the ARP Replies sent by the server on their way out and overwrites the src hw address with the unique hw address of one of the slaves in the bond such that different clients use different hw addresses for the server.


                   Linux Ethernet Bonding Driver mini-howto

The bonding driver originally came from Donald Becker's beowulf patches for
kernel 2.0. It has changed quite a bit since, and the original tools from
extreme-linux and beowulf sites will not work with this version of the driver.

For new versions of the driver, patches for older kernels and the updated
userspace tools, please follow the links at the end of this file.

Installation
============

1) Build kernel with the bonding driver
---------------------------------------
For the latest version of the bonding driver, use kernel 2.4.12 or above
(otherwise you will need to apply a patch).

Configure kernel with `make menuconfig/xconfig/config', and select
"Bonding driver support" in the "Network device support" section. It is
recommended to configure the driver as module since it is currently the only way
to pass parameters to the driver and configure more than one bonding device.

Build and install the new kernel and modules.

2) Get and install the userspace tools
--------------------------------------
This version of the bonding driver requires updated ifenslave program. The
original one from extreme-linux and beowulf will not work. Kernels 2.4.12
and above include the updated version of ifenslave.c in Documentation/network
directory. For older kernels, please follow the links at the end of this file.

IMPORTANT!!!  If you are running on Redhat 7.1 or greater, you need
to be careful because /usr/include/linux is no longer a symbolic link
to /usr/src/linux/include/linux.  If you build ifenslave while this is
true, ifenslave will appear to succeed but your bond won't work.  The purpose
of the -I option on the ifenslave compile line is to make sure it uses
/usr/src/linux/include/linux/if_bonding.h instead of the version from
/usr/include/linux.

To install ifenslave.c, do:
    # gcc -Wall -Wstrict-prototypes -O -I/usr/src/linux/include ifenslave.c -o ifenslave
    # cp ifenslave /sbin/ifenslave

3) Configure your system
------------------------
Also see the following section on the module parameters. You will need to add
at least the following line to /etc/conf.modules (or /etc/modules.conf):

        alias bond0 bonding

Use standard distribution techniques to define bond0 network interface. For
example, on modern RedHat distributions, create ifcfg-bond0 file in
/etc/sysconfig/network-scripts directory that looks like this:

DEVICE=bond0
IPADDR=192.168.1.1
NETMASK=255.255.255.0
NETWORK=192.168.1.0
BROADCAST=192.168.1.255
ONBOOT=yes
BOOTPROTO=none
USERCTL=no

(put the appropriate values for you network instead of 192.168.1).

All interfaces that are part of the trunk, should have SLAVE and MASTER
definitions. For example, in the case of RedHat, if you wish to make eth0 and
eth1 (or other interfaces) a part of the bonding interface bond0, their config
files (ifcfg-eth0, ifcfg-eth1, etc.) should look like this:

DEVICE=eth0
USERCTL=no
ONBOOT=yes
MASTER=bond0
SLAVE=yes
BOOTPROTO=none

(use DEVICE=eth1 for eth1 and MASTER=bond1 for bond1 if you have configured
second bonding interface).

Restart the networking subsystem or just bring up the bonding device if your
administration tools allow it. Otherwise, reboot. (For the case of RedHat
distros, you can do `ifup bond0' or `/etc/rc.d/init.d/network restart'.)

If the administration tools of your distribution do not support master/slave
notation in configuration of network interfaces, you will need to configure
the bonding device with the following commands manually:

    # /sbin/ifconfig bond0 192.168.1.1 up
    # /sbin/ifenslave bond0 eth0
    # /sbin/ifenslave bond0 eth1

(substitute 192.168.1.1 with your IP address and add custom network and custom
netmask to the arguments of ifconfig if required).

You can then create a script with these commands and put it into the appropriate
rc directory.

If you specifically need that all your network drivers are loaded before the
bonding driver, use one of modutils' powerful features : in your modules.conf,
tell that when asked for bond0, modprobe should first load all your interfaces :

probeall bond0 eth0 eth1 bonding

Be careful not to reference bond0 itself at the end of the line, or modprobe will
die in an endless recursive loop.

4) Module parameters.
---------------------
The following module parameters can be passed:

    mode=

Possible values are 0 (round robin policy, default) and 1 (active backup
policy), and 2 (XOR).  See question 9 and the HA section for additional info.

    miimon=

Use integer value for the frequency (in ms) of MII link monitoring. Zero value
is default and means the link monitoring will be disabled. A good value is 100
if you wish to use link monitoring. See HA section for additional info.

    downdelay=

Use integer value for delaying disabling a link by this number (in ms) after
the link failure has been detected. Must be a multiple of miimon. Default
value is zero. See HA section for additional info.

    updelay=

Use integer value for delaying enabling a link by this number (in ms) after
the "link up" status has been detected. Must be a multiple of miimon. Default
value is zero. See HA section for additional info.

    arp_interval=

Use integer value for the frequency (in ms) of arp monitoring.  Zero value
is default and means the arp monitoring will be disabled.  See HA section
for additional info.   This field is value in active_backup mode only.

    arp_ip_target=

An ip address to use when arp_interval is > 0.  This is the target of the
arp request sent to determine the health of the link to the target. 
Specify this value in ddd.ddd.ddd.ddd format.

If you need to configure several bonding devices, the driver must be loaded
several times. I.e. for two bonding devices, your /etc/conf.modules must look
like this:

alias bond0 bonding
alias bond1 bonding

options bond0 miimon=100
options bond1 -o bonding1 miimon=100

5) Testing configuration
------------------------
You can test the configuration and transmit policy with ifconfig. For example,
for round robin policy, you should get something like this:

[root]# /sbin/ifconfig
bond0     Link encap:Ethernet  HWaddr 00:C0:F0:1F:37:B4 
          inet addr:XXX.XXX.XXX.YYY  Bcast:XXX.XXX.XXX.255  Mask:255.255.252.0
          UP BROADCAST RUNNING MASTER MULTICAST  MTU:1500  Metric:1
          RX packets:7224794 errors:0 dropped:0 overruns:0 frame:0
          TX packets:3286647 errors:1 dropped:0 overruns:1 carrier:0
          collisions:0 txqueuelen:0

eth0      Link encap:Ethernet  HWaddr 00:C0:F0:1F:37:B4 
          inet addr:XXX.XXX.XXX.YYY  Bcast:XXX.XXX.XXX.255  Mask:255.255.252.0
          UP BROADCAST RUNNING SLAVE MULTICAST  MTU:1500  Metric:1
          RX packets:3573025 errors:0 dropped:0 overruns:0 frame:0
          TX packets:1643167 errors:1 dropped:0 overruns:1 carrier:0
          collisions:0 txqueuelen:100
          Interrupt:10 Base address:0x1080

eth1      Link encap:Ethernet  HWaddr 00:C0:F0:1F:37:B4 
          inet addr:XXX.XXX.XXX.YYY  Bcast:XXX.XXX.XXX.255  Mask:255.255.252.0
          UP BROADCAST RUNNING SLAVE MULTICAST  MTU:1500  Metric:1
          RX packets:3651769 errors:0 dropped:0 overruns:0 frame:0
          TX packets:1643480 errors:0 dropped:0 overruns:0 carrier:0
          collisions:0 txqueuelen:100
          Interrupt:9 Base address:0x1400

Questions :
===========

1.  Is it SMP safe?

        Yes.  The old 2.0.xx channel bonding patch was not SMP safe.
        The new driver was designed to be SMP safe from the start.

2.  What type of cards will work with it?

        Any Ethernet type cards (you can even mix cards - a Intel
        EtherExpress PRO/100 and a 3com 3c905b, for example).
        You can even bond together Gigabit Ethernet cards!

3.  How many bonding devices can I have?

        One for each module you load. See section on module parameters for how
        to accomplish this.

4.  How many slaves can a bonding device have?

        Limited by the number of network interfaces Linux supports and the
        number of cards you can place in your system.

5.  What happens when a slave link dies?

        If your ethernet cards support MII status monitoring and the MII
        monitoring has been enabled in the driver (see description of module
        parameters), there will be no adverse consequences. This release
        of the bonding driver knows how to get the MII information and
        enables or disables its slaves according to their link status.
        See section on HA for additional information.

        For ethernet cards not supporting MII status, or if you wish to
        verify that packets have been both send and received, you may
        configure the arp_interval and arp_ip_target.  If packets have
        not been sent or received during this interval, an arp request
        is sent to the target to generate send and receive traffic. 
        If after this interval, either the successful send and/or
        receive count has not incremented, the next slave in the sequence
        will become the active slave.

        If neither mii_monitor and arp_interval is configured, the bonding
        driver will not handle this situation very well. The driver will
        continue to send packets but some packets will be lost. Retransmits
        will cause serious degradation of performance (in the case when one
        of two slave links fails, 50% packets will be lost, which is a serious
        problem for both TCP and UDP).

6.  Can bonding be used for High Availability?

        Yes, if you use MII monitoring and ALL your cards support MII link
        status reporting. See section on HA for more information.

7.  Which switches/systems does it work with?

        In round-robin mode, it works with systems that support trunking:
       
        * Cisco 5500 series (look for EtherChannel support).
        * SunTrunking software.
        * Alteon AceDirector switches / WebOS (use Trunks).
        * BayStack Switches (trunks must be explicitly configured). Stackable
          models (450) can define trunks between ports on different physical
          units.
        * Linux bonding, of course !
       
        In Active-backup mode, it should work with any Layer-II switches.

8.  Where does a bonding device get its MAC address from?

        If not explicitly configured with ifconfig, the MAC address of the
        bonding device is taken from its first slave device. This MAC address
        is then passed to all following slaves and remains persistent (even if
        the the first slave is removed) until the bonding device is brought
        down or reconfigured.
       
        If you wish to change the MAC address, you can set it with ifconfig:

          # ifconfig bond0 ha ether 00:11:22:33:44:55

        The MAC address can be also changed by bringing down/up the device
        and then changing its slaves (or their order):
       
          # ifconfig bond0 down ; modprobe -r bonding
          # ifconfig bond0 .... up
          # ifenslave bond0 eth...

        This method will automatically take the address from the next slave
        that will be added.
       
        To restore your slaves' MAC addresses, you need to detach them
        from the bond (`ifenslave -d bond0 eth0'), set them down
        (`ifconfig eth0 down'), unload the drivers (`rmmod 3c59x', for
        example) and reload them to get the MAC addresses from their
        eeproms. If the driver is shared by several devices, you need
        to turn them all down. Another solution is to look for the MAC
        address at boot time (dmesg or tail /var/log/messages) and to
        reset it by hand with ifconfig :

          # ifconfig eth0 down
          # ifconfig eth0 hw ether 00:20:40:60:80:A0

9.  Which transmit polices can be used?

        Round robin, based on the order of enslaving, the output device
        is selected base on the next available slave.  Regardless of
        the source and/or destination of the packet.

        XOR, based on (src hw addr XOR dst hw addr) % slave cnt.  This
        selects the same slave for each destination hw address.

        Active-backup policy that ensures that one and only one device will
        transmit at any given moment. Active-backup policy is useful for
        implementing high availability solutions using two hubs (see
        section on HA).

High availability
=================

To implement high availability using the bonding driver, you need to
compile the driver as module because currently it is the only way to pass
parameters to the driver. This may change in the future.

High availability is achieved by using MII status reporting. You need to
verify that all your interfaces support MII link status reporting. On Linux
kernel 2.2.17, all the 100 Mbps capable drivers and yellowfin gigabit driver
support it. If your system has an interface that does not support MII status
reporting, a failure of its link will not be detected!

The bonding driver can regularly check all its slaves links by checking the
MII status registers. The check interval is specified by the module argument
"miimon" (MII monitoring). It takes an integer that represents the
checking time in milliseconds. It should not come to close to (1000/HZ)
(10 ms on i386) because it may then reduce the system interactivity. 100 ms
seems to be a good value. It means that a dead link will be detected at most
100 ms after it goes down.

Example:

   # modprobe bonding miimon=100

Or, put in your /etc/modules.conf :

   alias bond0 bonding
   options bond0 miimon=100

There are currently two policies for high availability, depending on whether
a) hosts are connected to a single host or switch that support trunking
b) hosts are connected to several different switches or a single switch that
   does not support trunking.

1) HA on a single switch or host - load balancing
-------------------------------------------------
It is the easiest to set up and to understand. Simply configure the
remote equipment (host or switch) to aggregate traffic over several
ports (Trunk, EtherChannel, etc.) and configure the bonding interfaces.
If the module has been loaded with the proper MII option, it will work
automatically. You can then try to remove and restore different links
and see in your logs what the driver detects. When testing, you may
encounter problems on some buggy switches that disable the trunk for a
long time if all ports in a trunk go down. This is not Linux, but really
the switch (reboot it to ensure).

Example 1 : host to host at double speed

          +----------+                          +----------+
          |          |eth0                  eth0|          |
          | Host A   +--------------------------+  Host B  |
          |          +--------------------------+          |
          |          |eth1                  eth1|          |
          +----------+                          +----------+

  On each host :
     # modprobe bonding miimon=100
     # ifconfig bond0 addr
     # ifenslave bond0 eth0 eth1

Example 2 : host to switch at double speed

          +----------+                          +----------+
          |          |eth0                 port1|          |
          | Host A   +--------------------------+  switch  |
          |          +--------------------------+          |
          |          |eth1                 port2|          |
          +----------+                          +----------+

  On host A :                             On the switch :
     # modprobe bonding miimon=100           # set up a trunk on port1
     # ifconfig bond0 addr                     and port2
     # ifenslave bond0 eth0 eth1

2) HA on two or more switches (or a single switch without trunking support)
---------------------------------------------------------------------------
This mode is more problematic because it relies on the fact that there
are multiple ports and the host's MAC address should be visible on one
port only to avoid confusing the switches.

If you need to know which interface is the active one, and which ones are
backup, use ifconfig. All backup interfaces have the NOARP flag set.

To use this mode, pass "mode=1" to the module at load time :

    # modprobe bonding miimon=100 mode=1

Or, put in your /etc/modules.conf :

    alias bond0 bonding
    options bond0 miimon=100 mode=1

Example 1: Using multiple host and multiple switches to build a "no single
point of failure" solution.


                |                                     |
                |port3                           port3|
          +-----+----+                          +-----+----+
          |          |port7       ISL      port7|          |
          | switch A +--------------------------+ switch B |
          |          +--------------------------+          |
          |          |port8                port8|          |
          +----++----+                          +-----++---+
          port2||port1                           port1||port2
               ||             +-------+               ||
               |+-------------+ host1 +---------------+|
               |         eth0 +-------+ eth1           |
               |                                       |
               |              +-------+                |
               +--------------+ host2 +----------------+
                         eth0 +-------+ eth1

In this configuration, there are an ISL - Inter Switch Link (could be a trunk),
several servers (host1, host2 ...) attached to both switches each, and one or
more ports to the outside world (port3...). One an only one slave on each host
is active at a time, while all links are still monitored (the system can
detect a failure of active and backup links).

Each time a host changes its active interface, it sticks to the new one until
it goes down. In this example, the hosts are not too much affected by the
expiration time of the switches' forwarding tables.

If host1 and host2 have the same functionality and are used in load balancing
by another external mechanism, it is good to have host1's active interface
connected to one switch and host2's to the other. Such system will survive
a failure of a single host, cable, or switch. The worst thing that may happen
in the case of a switch failure is that half of the hosts will be temporarily
unreachable until the other switch expires its tables.

Example 2: Using multiple ethernet cards connected to a switch to configure
           NIC failover (switch is not required to support trunking).


          +----------+                          +----------+
          |          |eth0                 port1|          |
          | Host A   +--------------------------+  switch  |
          |          +--------------------------+          |
          |          |eth1                 port2|          |
          +----------+                          +----------+

  On host A :                                 On the switch :
     # modprobe bonding miimon=100 mode=1     # (optional) minimize the time
     # ifconfig bond0 addr                    # for table expiration
     # ifenslave bond0 eth0 eth1

Each time the host changes its active interface, it sticks to the new one until
it goes down. In this example, the host is strongly affected by the expiration
time of the switch forwarding table.

3) Adapting to your switches' timing
------------------------------------
If your switches take a long time to go into backup mode, it may be
desirable not to activate a backup interface immediately after a link goes
down. It is possible to delay the moment at which a link will be
completely disabled by passing the module parameter "downdelay" (in
milliseconds, must be a multiple of miimon).

When a switch reboots, it is possible that its ports report "link up" status
before they become usable. This could fool a bond device by causing it to
use some ports that are not ready yet. It is possible to delay the moment at
which an active link will be reused by passing the module parameter "updelay"
(in milliseconds, must be a multiple of miimon).

A similar situation can occur when a host re-negotiates a lost link with the
switch (a case of cable replacement).

A special case is when a bonding interface has lost all slave links. Then the
driver will immediately reuse the first link that goes up, even if updelay
parameter was specified. (If there are slave interfaces in the "updelay" state,
the interface that first went into that state will be immediately reused.) This
allows to reduce down-time if the value of updelay has been overestimated.

Examples :

    # modprobe bonding miimon=100 mode=1 downdelay=2000 updelay=5000
    # modprobe bonding miimon=100 mode=0 downdelay=0 updelay=5000

4) Limitations
--------------
The main limitations are :
  - only the link status is monitored. If the switch on the other side is
    partially down (e.g. doesn't forward anymore, but the link is OK), the link
    won't be disabled. Another way to check for a dead link could be to count
    incoming frames on a heavily loaded host. This is not applicable to small
    servers, but may be useful when the front switches send multicast
    information on their links (e.g. VRRP), or even health-check the servers.
    Use the arp_interval/arp_ip_target parameters to count incoming/outgoing
    frames. 

Resources and links
===================

Current development on this driver is posted to:
 - http://www.sourceforge.net/projects/bonding/

Donald Becker's Ethernet Drivers and diag programs may be found at :
 - http://www.scyld.com/network/

You will also find a lot of information regarding Ethernet, NWay, MII, etc. at
www.scyld.com.

For new versions of the driver, patches for older kernels and the updated
userspace tools, take a look at Willy Tarreau's site :
 - http://wtarreau.free.fr/pub/bonding/
 - http://www-miaif.lip6.fr/willy/pub/bonding/

To get latest informations about Linux Kernel development, please consult
the Linux Kernel Mailing List Archives at :
   http://boudicca.tux.org/hypermail/linux-kernel/latest/